Easy Jenkins with a System Container
September 29, 2019

Intro
Jenkins is one of the best tools for Continuous Integration (CI) due to it’s maturity, huge number of plugins, support for distributed builds, etc.
One of the key features of Jenkins is its support for Docker containers (via the Docker plugin), as it makes it easy to create CI pipelines that rely on specific tools without having to install the tools in the host itself.
In fact Jenkins itself is distributed as a Docker container, which is nice because you avoid having to install Jenkins and its dependencies directly on the host machine.
Turns out however that there are several problems that arise when running Jenkins in a container and using the Jenkins Docker plugin in your pipelines.
This article describes these problems and shows how they can be addressed in a simple way by using a Nestybox system container.
If you are planning to use Jenkins for your CI, this article will help you setup things in a few minutes.
Contents
- Problems with Jenkins inside a Container
- Problems with Jenkins Docker Agents
- Yet More Problems
- Recap
- Simple solution with Nestybox System Containers
- Why does this work?
- Try our Free Trial!
Problems with Jenkins inside a Container
When installing Jenkins on a host, the easiest way to do it is to run a Docker container that contains the Jenkins server in it. This saves you the trouble of having to install Jenkins and all it’s dependencies on the host machine directly.
Jenkins provides a Docker image called jenkins/jenkins that has the Jenkins server in it.
However, if your Jenkins pipeline uses Docker as an agent (which is
common and convenient), the jenkins/jenkins image won’t work.
For example, if your pipeline has something like this:
Jenkinsfile:
pipeline {
    agent { docker { image 'golang' } }

    stages {
        stage('build') {
            steps {
                sh 'go build main.go'
            }
        }
    }
}
then Jenkins will request Docker to run the golang image. But since
Docker is not present in the jenkins/jenkins container, the pipeline
will fail.
To solve this, you must first create a custom Docker image that has Jenkins and the Docker CLI in it. Here is sample Dockerfile for such an image:
FROM jenkins/jenkins

# Docker install
USER root
RUN apt-get update && apt-get install -y \
       apt-transport-https \
       ca-certificates \
       curl \
       gnupg2 \
       software-properties-common
RUN curl -fsSL https://download.docker.com/linux/debian/gpg | apt-key add -
RUN apt-key fingerprint 0EBFCD88
RUN add-apt-repository \
       "deb [arch=amd64] https://download.docker.com/linux/debian \
       $(lsb_release -cs) \
       stable"
RUN apt-get update && apt-get install -y docker-ce-cli

USER jenkins
You can build it with:
$ docker build -t jenkins-docker .
Now, when running this image you must now mount the host machine’s Docker socket into the Jenkins master container. That’s because this image only has Jenkins and the Docker CLI in it, but not the Docker daemon. Thus, you must connect the Docker CLI in the Jenkins container to the Docker daemon on the host by mounting the daemon’s socket into the container:
$ docker run --rm -d -v /var/run/docker.sock:/var/run/docker.sock -P jenkins-docker
But even this is not sufficient. Turns out that the jenkins/jenkins
image (which the Dockerfile above uses as its base image) defaults to
a non-root user inside the container. This user will not have
permissions to access the Docker daemon’s socket mounted into the
container. Thus, when you run your pipeline with Jenkins, you’ll get
this error:
Got permission denied while trying to connect to the Docker daemon socket at unix:///var/run/docker.sock ...
The solution is to run the image above with the following command:
$ docker run --rm -d --group-add $(stat -c '%g' /var/run/docker.sock) -v /var/run/docker.sock:/var/run/docker.sock -P jenkins-docker
With this command, the Jenkins master will run inside the container
and will be able to invoke the Docker daemon on the host to create
the agent containers (such as the golang container for the pipeline
example above).
The following figure shows the configuration.
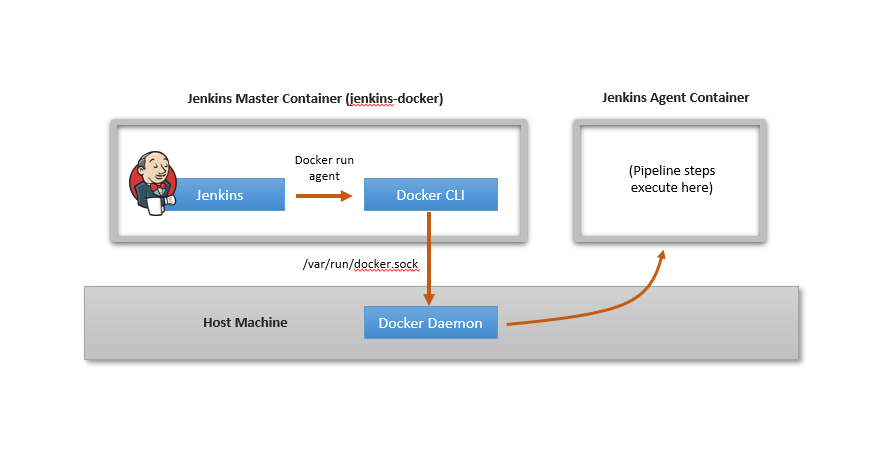
While this configuration works, notice that all containers spawned by Jenkins are created at the host level. This is fine in many cases, but causes problems when your pipeline has Docker commands in it as described in the next section.
Problems with Jenkins Docker Agents
Sometimes it’s useful for a pipeline stage to invoke Docker commands.
For example, the pipeline definition below configures a Docker agent
with the docker image and runs a docker build step in it.
Jenkinsfile:
pipeline {
    agent { docker { image 'docker' } }

    stages {
        stage('build') {
            steps {
                sh 'docker build -t my-container .'
            }
        }
    }
}
Ideally this should run without problems. But unfortunately that’s not the case. Running this pipeline results in a “permission denied” error reported by the Jenkins docker agent:
Got permission denied while trying to connect to the Docker daemon socket at unix:///var/run/docker.sock ...
The problem here is that when Jenkins uses Docker to create the agent
container, it mounts the host’s Docker socket on the agent such that
the agent can issue Docker commands (such as the docker build
command in the pipeline shown above).
The following figure shows the setup:
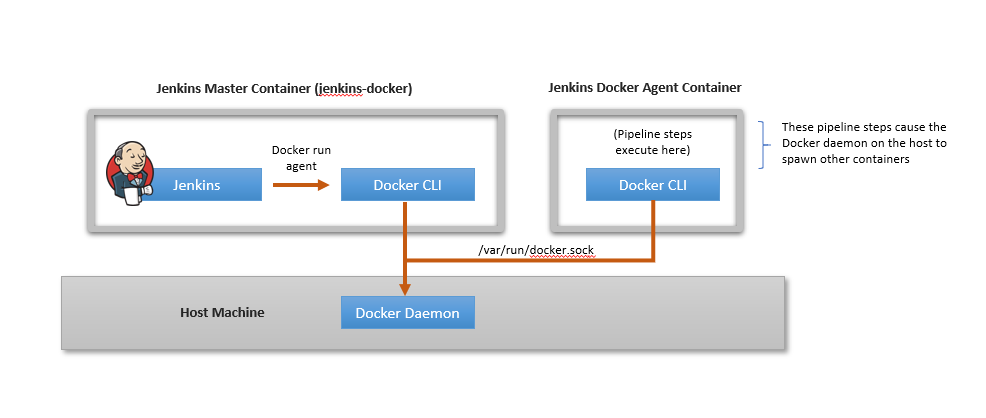
Mounting the host’s Docker socket into the agent is fine, except that Jenkins also sets up the default user within the agent container to be a non-root user. This non-root user does not have permission to access the mounted Docker socket.
As a result, when the pipeline step with docker build runs within
the agent container, we get the permission error shown above.
To solve this, you are now forced to create a custom image for the Docker agent in which the non-root user is added to the Docker socket’s group. It’s painful since all you wanted to do was run a simple pipeline.
Yet More Problems
Even if you create a custom image for the Docker agent to get around the problem described in the prior section, you may still face more problems.
For example, in the following pipeline configuration, assume image
my-docker-agent is a custom Docker agent image that solves the
problem in the prior section.
The pipeline has a single step that requires running a Docker
container named my-container within the Docker agent container.
Jenkinsfile:
pipeline {
    agent { docker { image 'my-docker-agent' } }

    stages {
        stage('build') {
            steps {
                sh 'docker run --name my-container my-container'
            }
        }
    }
}
This looks perfectly fine, but the pipeline step docker run --name
my-container my-container will fail if the host already has a running
container named my-container.
This failure occurs because the Docker daemon in the host is the sole
entity creating containers. The Jenkins agent container is simply
connected to the Docker daemon on the host via the host’s Docker
socket. Thus my-container is created by the Docker daemon on the
host, and that creation will only succeed if there is no other
container with the same name.
In order to avoid this type of failure you are now forced to either avoid naming containers in your pipeline steps (which is fine but restrictive) or simply dedicate the machine to running Jenkins only. This way you eliminate the chances of naming collisions between containers ran by Jenkins and other containers.
The problem is not specific to container names. It occurs when naming other Docker resources too, such as networks or volumes.
All of this adds to the pain points previously discussed.
Recap
Let’s quickly recap the problems that we’ve faced up to now in our quest to simply run Jenkins in a container and use the Jenkins Docker plugin:
1) We had to create a custom Docker image for the Jenkins master. Image
jenkins/jenkins did not suffice.
2) We had to run that Jenkins master container with a volume mount of
the host’s Docker daemon, and with the --group-add flag that sets
correct permission for the volume mount. This reduces isolation
between the Jenkins master container and the host.
3) If we want to run Docker commands in our Jenkins pipeline, we had
to create a custom Docker image for the Jenkins agent. Image
docker did not suffice.
4) In the pipeline steps, the Docker commands we issued were performed with respect to the host’s Docker daemon. As a result, these may fail if they name Docker resources (containers, networks, volumes) which collide with resources used in the host already.
While these may seem as trivial problems, they will likely take you several hours to figure out (as they took me while researching Jenkins interactions with Docker), taking precious time away from your real objective of running your Jenkins pipeline while leveraging the power of Docker containers.
Simple solution with Nestybox System Containers
It’s possible to completely avoid problems (2), (3), and (4) described in the prior section by running Jenkins inside a Nestybox system container.
Problem (1) is inevitable because we need a container image that has Jenkins and Docker within it whenever we want to run Jenkins in a container and configure it with its Docker plugin.
The solution consists of using a system container image that acts as a dedicated Jenkins sandbox and has the following software in it:
-
Jenkins master
-
Docker (not just the CLI, the Docker daemon too!)
-
Supervisord (the system container’s process manager)
We have such an image in the Nestybox Docker Hub, together with it’s
Dockerfile. It’s called nestybox/jenkins-syscont and it’s here.
The Dockerfile and supervisord configuration for that image can be found in the Nestybox GitHub site here.
Here is how things would work. We assume that Nestybox’s Sysbox container runtime is already installed on your host (see Free Trial below for info on how to obtain it).
First, launch the system container with this simple Docker command:
$ docker run --rm -d --runtime=sysbox-runc -P nestybox/jenkins-syscont
This command tells Docker to use the Sysbox container runtime to launch the system container.
When the system container starts, supervisord will start Jenkins and the Docker daemon inside of the system container. You can think of the system container as a container-based virtual host: in many ways similar to a VM but faster, easier to use, and much more efficient.
Notice how the simpler command avoids problem (2) above (i.e., no volume mount or permission to the host’s Docker socket are required). In fact the Docker daemon inside the system container is completely isolated from the Docker daemon on the host.
Notice also that even though the system container runs the Docker daemon within it, it’s not an unsecure privileged container. That’s a key feature of Nestybox system containers.
The following figure shows the setup.

Once the system container is running, simply access Jenkins via its web based UI and configure it to run your pipeline. You can obtain access the Jenkins UI by directing your browser to your host’s IP and port associated with the system container.
For example, on my host Jenkins is listening on port 32789 as shown below:
$ docker ps
CONTAINER ID        IMAGE               COMMAND                  CREATED             STATUS              PORTS                                               NAMES
3a28935e5c5e        jenkins-syscont     "/usr/bin/supervisord"   4 seconds ago       Up 2 seconds        0.0.0.0:32789->8080/tcp, 0.0.0.0:32788->50000/tcp   zealous_taussig
Thus, if I direct my browser to that port, I’ll see Jenkins there:
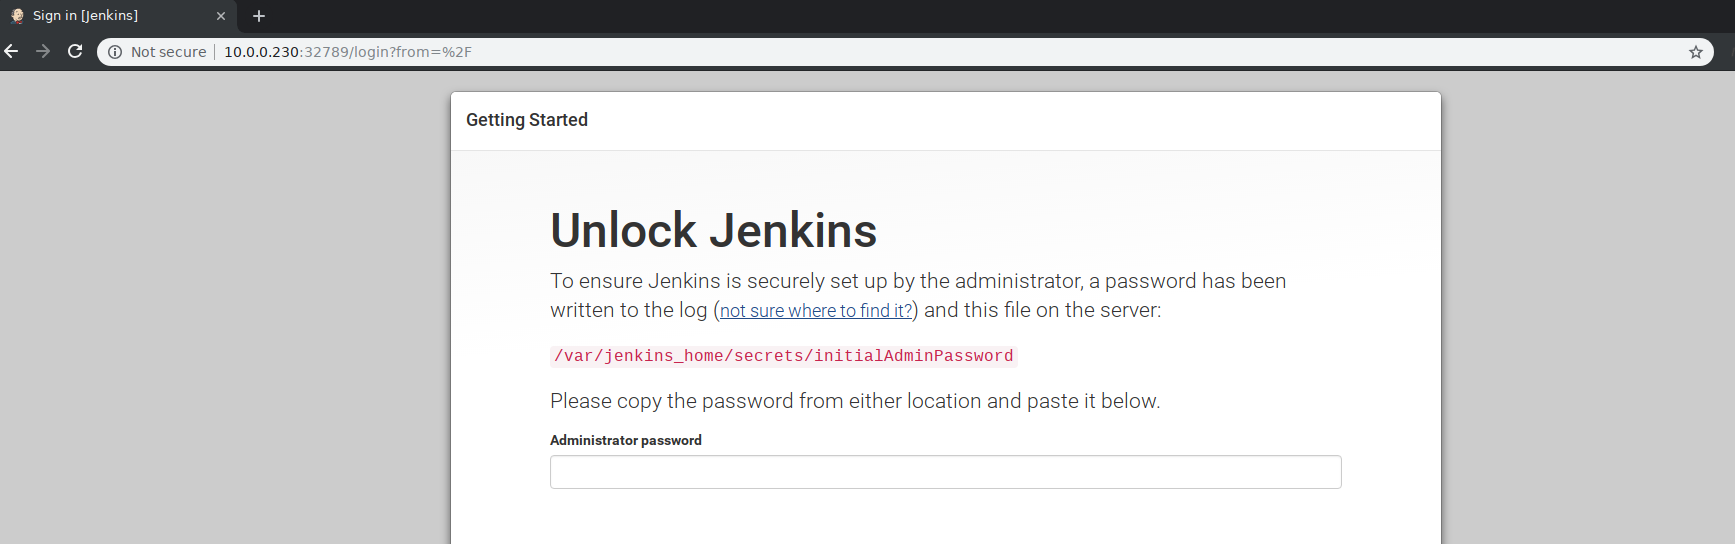
I can then access Jenkins by pulling the credentials from the system container:
$ docker exec -it zealous_taussig cat /var/jenkins_home/secrets/initialAdminPassword
10762f55c17d42bfb7a1e98fb2ee278c
You can then configure and run your pipeline as usual. For example, the pipeline configuration for the golang image we showed earlier (repeated below for convenience) works perfectly fine.
Jenkinsfile:
pipeline {
    agent { docker { image 'golang' } }

    stages {
        stage('build') {
            steps {
                sh 'go build main.go'
            }
        }
    }
}
In this case the docker container with the golang image would be created by the Docker daemon running inside the system container.
Now, what if your pipeline steps need to run Docker commands (e.g., to build or run a container from within your pipeline)? That’s easy now: simply specify the pipeline’s agent configuration as follows:
Jenkinsfile:
pipeline {
    agent {
        docker {
            image 'docker'
            args '-v /var/run/docker.sock:/var/run/docker.sock'
        }
    }

    stages {
        sh 'docker run hello-world'
    }
}
As shown, the Docker agent uses the docker image (the official
Docker-Hub image containing the Docker CLI in it). No custom image
needed anymore. Problem (3) above is gone.
Also, the Docker agent’s docker image runs with a volume
mount of the Docker socket (args '-v /var/run/docker.sock:/var/run/docker.sock').
This is required since the Docker agent’s docker image only has the
Docker CLI in it, not the daemon.
But here is the key: that’s a volume mount to the Docker daemon running inside the system container, not the Docker daemon on the host. In other words, the Docker daemon on the host is completely isolated from whatever Docker containers are being launched by Jenkins. This solves problem (4).
Why does this work?
Fundamentally, this solution works because the system container image is acting as a virtual host (or sandboxed environment) inside of which Jenkins can create containers by leveraging a dedicated Docker daemon, in complete isolation from the underlying host.
The permission issues are gone, because all work inside the system container occurs under user “root” (which is mapped to a non-root user on the host by the Nestybox system container in order to enhance security).
This means you can use the host for other tasks too, without ever worrying about colliding with Jenkins and it’s container operations.
It also means that when writing the pipeline steps, you have no restrictions even if those pipeline steps require building or launching Docker containers. Since the pipeline is running inside the system container, you can be sure that you’ll never collide with Docker resources on the host itself.
With this approach, you can launch Jenkins, configure it via it’s web UI and have your first pipeline running in minutes.
Try our Free Trial!
We have developed a prototype and are looking for early adopters.
You can get access to free trial on our website. We think you’ll find it easy to run and useful. Your feedback will be much appreciated!