Secure Docker-in-Kubernetes
January 03, 2022
Contents
- Intro
- Motivation
- Setup
- Why is Sysbox Useful Here?
- Kubernetes Cluster Creation
- Defining the Pods (with Docker inside)
- Persistent Docker Cache
- Deploying the Pods
- Verify the Pods are Working
- Exposing the Pods IP to the outside
- Connecting Remotely to the Pods
- Shared Docker Images across Docker Engines
- Resource Limits
- Scaling Pod Instances
- Persistent Volume Removal
- Docker Build Context
- Conclusion
- Resources
Intro
This post shows you how to run Docker inside a secure (rootless) Kubernetes pod. That is, you create one or more Kubernetes pods and inside of each you run Docker.
While running Docker inside pods is not new, what’s different here is that the pod will not be an insecure “privileged” pod. Instead, it will be a fully unprivileged (rootless) pod launched with Kubernetes and the Sysbox runtime, which means you can use this setup in enterprise settings where security is very important.
We will show you how to set this up quickly and easily with examples, and afterwards you can adjust these per your needs.
Motivation
There are several uses cases for running Docker inside a Kubernetes pod; a couple of useful ones are:
-
Creating a pool of Docker engines on the cloud. Each user is assigned one such engine and connects remotely to it via the Docker CLI. Each Docker engine runs inside a Kubernetes pod (instead of a VM), so operators can leverage the power of Kubernetes to manage the pool’s resources.
-
Running Docker inside Kubernetes-native CI jobs. Each job is deployed inside a pod and the job uses the Docker engine running inside the pod to build container images (e.g., Buildkit), push them to some repo, run them, etc.
In this blog post we focus on the first use case. A future blog post will focus on the second use case.
Setup
The diagram below shows the setup we will create:
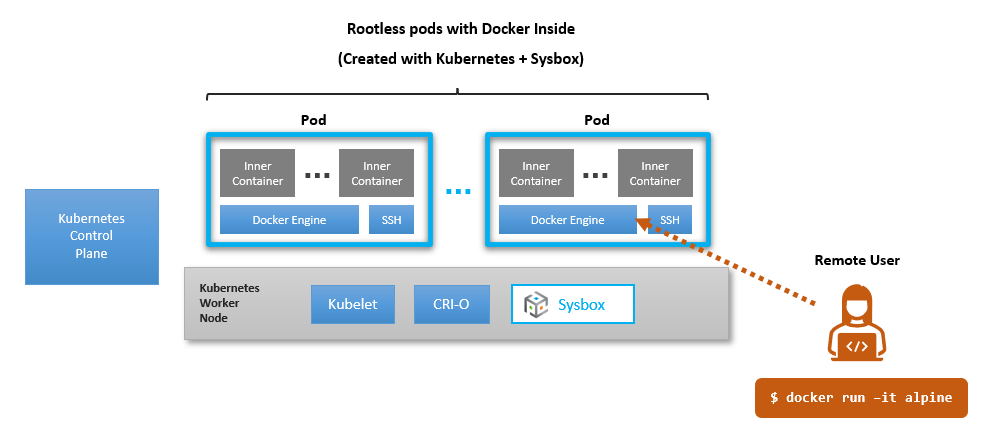
As shown:
-
Kubernetes will deploy the pods with the Sysbox runtime.
-
Each pod will run a Docker engine and SSH in it.
-
Each Docker engine will be assigned to a user (say a developer working from home with a laptop).
-
The user will connect remotely to her assigned Docker engine using the Docker CLI.
Why is Sysbox Useful Here?
Prior to Sysbox, the setup shown above required insecure “privileged” containers or VM-based alternatives such as KubeVirt.
But privileged containers are too insecure, and VMs are slower, heavier, and harder to setup (e.g., KubeVirt requires nested virtualization on the cloud).
With Sysbox, you can do this more easily and efficiently, using secure (rootless) containers without resorting to VMs.
Kubernetes Cluster Creation
Ok, let’s get to it.
First, you need a Kubernetes cluster with Sysbox installed in it. It’s pretty easy to set this up as Sysbox works on EKS, GKE, AKS, on-prem Kubernetes, etc.
See these instructions to install Sysbox on your cluster.
For this example, I am using a 3-node Kubernetes cluster on GKE, and I’ve installed Sysbox on it with this single command:
kubectl apply -f https://raw.githubusercontent.com/nestybox/sysbox/master/sysbox-k8s-manifests/sysbox-install.yaml
Defining the Pods (with Docker inside)
Once Sysbox is installed on your cluster, next step is to define the pods that carry the Docker engine in them.
We need a container image that carries the Docker engine. In this example, we
use an image called nestybox/alpine-supervisord-docker:latest that carries
Alpine + Supervisord + sshd + Docker. The Dockerfile is
here.
- NOTE: You can use another image if you would like. Just make sure that the image is configured to start Docker and SSH inside the container automatically.
Next, let’s create a Kubernetes StatefulSet that will provision 6 pod instances (e.g., 2 per node). Each pod will allow remote access to the Docker engine via ssh. Here is the associated yaml file:
$ cat dockerd-statefulset.yaml
apiVersion: apps/v1
kind: StatefulSet
metadata:
  name: dockerd-statefulset
spec:
  selector:
    matchLabels:
      app: dockerd
  serviceName: "dockerd"
  replicas: 6
  template:
    metadata:
      labels:
        app: dockerd
      annotations:
        io.kubernetes.cri-o.userns-mode: "auto:size=65536"
    spec:
      runtimeClassName: sysbox-runc
      terminationGracePeriodSeconds: 20
      containers:
      - name: alpine-docker
        image: nestybox/alpine-supervisord-docker:latest
        ports:
        - containerPort: 22
          name: ssh
        volumeMounts:
        - name: docker-cache
          mountPath: /var/lib/docker
  volumeClaimTemplates:
  - metadata:
      name: docker-cache
    spec:
      accessModes: [ "ReadWriteOnce" ]
      storageClassName: "gce-pd"
      resources:
        requests:
          storage: 2Gi
  podManagementPolicy: Parallel
Before we apply this yaml, let’s analyze a few things about it.
First, we chose a StatefulSet (instead of a Deployment) because we want each pod to have unique and persistent network and storage resources across it’s life cycle. This way if a pod goes down, we can recreate it and it will have the same IP address and the same persistent storage assigned to it.
Second, note the following about the StatefulSet spec:
-
It creates 6 pods in parallel (see replicas and podManagementPolicy).
-
The pods are rootless by virtue of using Sysbox (see the cri-o annotation and sysbox-runc runtimeClassName).
-
Each pod exposes port 22 (ssh).
-
Each pod has a persistent volume mounted onto the pod’s
/var/lib/dockerdirectory (see next section).
Persistent Docker Cache
In the StatefulSet yaml shown above, we mounted a persistent volume on each
pod’s /var/lib/docker directory.
Doing this is optional, but enables us to preserve the state of the Docker engine (aka “the Docker cache”) across the pod’s life cycle. This state includes pulled images, Docker volumes and networks, and more. Without this, the Docker state will be lost when the pod stops.
Note that each pod must have a dedicated volume for this. Multiple pods can’t share the same volume because each Docker engine must have a dedicated cache (it’s a Docker requirement).
Also, note that the persistent storage is provisioned dynamically (at pod
creation time, one volume per pod). This is done via a volumeClaimTemplate
directive, which claims a 2GiB volume of a storage class named “gce-pd”.
- For this example, 2GiB is sufficient; for a production scenario, you’ll likely need much more storage since Docker storage can add up over time when pulling multiple images.
What is “gce-pd”? It’s a storage class that uses the Google Compute Engine (GCE) storage provisioner. The resource definition is below:
$ cat gce-pd.yaml
apiVersion: storage.k8s.io/v1
kind: StorageClass
metadata:
  name: gce-pd
provisioner: kubernetes.io/gce-pd
parameters:
  type: pd-ssd
  fstype: ext4
  replication-type: none
volumeBindingMode: WaitForFirstConsumer
Since my cluster is on GKE, using the GCE storage provisioner makes sense. Depending on your scenario, you can use any other provisioner supported by Kubernetes (e.g., AWS EBS, Azure Disk, etc).
In addition, whenever we use volumeClaimTemplate, we must also define a dummy
local-storage class (as otherwise Kubernetes will fail to deploy the pod):
$ cat local-storage.yaml
apiVersion: storage.k8s.io/v1
kind: StorageClass
metadata:
  name: local-storage
provisioner: kubernetes.io/no-provisioner
volumeBindingMode: WaitForFirstConsumer
Deploying the Pods
With this in place, we can now apply the yamls shown in the prior section.
$ kubectl apply -f gce-pd.yaml
$ kubectl apply -f local-storage.yaml
$ kubectl apply -f dockerd-statefulset.yaml
If all goes well, you should see the StatefulSet pods deployed within 10->20 seconds, as shown below:
$  kubectl get pods

NAME                    READY   STATUS    RESTARTS   AGE
dockerd-statefulset-0   1/1     Running   0          9m51s
dockerd-statefulset-1   1/1     Running   0          9m51s
dockerd-statefulset-2   1/1     Running   0          9m51s
dockerd-statefulset-3   1/1     Running   0          9m51s
dockerd-statefulset-4   1/1     Running   0          9m51s
dockerd-statefulset-5   1/1     Running   0          9m51s
You should also see the persistent volumes that Kubernetes dynamically allocated to the pods:
$ kubectl get pv

NAME                                       CAPACITY   ACCESS MODES   RECLAIM POLICY   STATUS   CLAIM                                        STORAGECLASS   REASON   AGE
pvc-377c35d8-4075-4d40-9d26-7e4acd42cbea   2Gi        RWO            Delete           Bound    default/docker-cache-dockerd-statefulset-1   gce-pd                  14m
pvc-5937a358-5111-4b91-9cce-87a8efabbb62   2Gi        RWO            Delete           Bound    default/docker-cache-dockerd-statefulset-3   gce-pd                  14m
pvc-5ca2f6ba-627c-4b19-8cf0-775395868821   2Gi        RWO            Delete           Bound    default/docker-cache-dockerd-statefulset-4   gce-pd                  14m
pvc-9812e3df-6d7e-439a-9702-03925af098a5   2Gi        RWO            Delete           Bound    default/docker-cache-dockerd-statefulset-0   gce-pd                  14m
pvc-afd183ab-1621-44a1-aaf0-da0ccf9f96a8   2Gi        RWO            Delete           Bound    default/docker-cache-dockerd-statefulset-5   gce-pd                  14m
pvc-e3f65dea-4f97-4c4b-a902-97bf67ed698b   2Gi        RWO            Delete           Bound    default/docker-cache-dockerd-statefulset-2   gce-pd                  14m
Verify the Pods are Working
Let’s exec into one of the pods to verify all is good:
$ kubectl exec dockerd-statefulset-0 -- ps
PID   USER     TIME  COMMAND
    1 root      0:00 {supervisord} /usr/bin/python3 /usr/bin/supervisord -n
   14 root      0:00 /usr/bin/dockerd
   15 root      0:00 sshd: /usr/sbin/sshd -D [listener] 0 of 10-100 startups
   45 root      0:02 containerd --config /var/run/docker/containerd/containerd.toml --log-level info
  638 root      0:00 ps
Perfect: supervisord (our process manager in the pod) is running as PID 1, and it has started Dockerd and sshd.
Let’s check that Docker is working well:
$ kubectl exec dockerd-statefulset-0 -- docker ps
CONTAINER ID   IMAGE     COMMAND   CREATED   STATUS    PORTS     NAMES
Great, Docker is responding normally.
Finally, check that the pod is rootless:
$ kubectl exec -it dockerd-statefulset-0 -- cat /proc/self/uid_map
    0     362144      65536
This means User-ID 0 in the pod (root) is mapped to user-ID 362144 on the host, and the mapping extends for 65536 User-IDs.
In other words, you can work as root inside the pod without fear, as it has no privileges on the host.
Exposing the Pod’s IP Outside the Cluster
Now that the pods are running, we want to access the Docker engine inside each pod. In this example, we want to access the pods from outside the cluster, and do it securely.
For example, we want to give a developer sitting at home with her laptop access to a Docker engine inside one of the pods we’ve deployed.
To do this, we are going to create a Kubernetes “Load Balancer” service that exposes the pod’s SSH port externally.
Note that we need one such service per pod (rather than a single service that load balances across several pods). The reason is that the pods we’ve created are not fungible: each one carries a stateful Docker engine.
The simplest (but least automated) way to do this is to manually create a
LoadBalancer service for each pod. For example, for pod dockerd-statefuset-0:
apiVersion: v1
kind: Service
metadata:
  name: dockerd0-service
spec:
  type: LoadBalancer
  selector:
    statefulset.kubernetes.io/pod-name: dockerd-statefulset-0
  ports:
  - protocol: TCP
    port: 22
    targetPort: 22
Applying this yaml causes Kubernetes to expose port 22 (SSH) of the dockerd-statefulset-0 via an external IP:
$ kubectl get svc dockerd0-service
NAME               TYPE           CLUSTER-IP    EXTERNAL-IP    PORT(S)        AGE
dockerd0-service   LoadBalancer   10.72.8.250   35.194.9.153   22:32547/TCP   3m57s
We need to repeat this for each of the pods of the stateful set.
Note that there are automated ways to do this, but they are beyond the scope of this blog.
Connecting Remotely to the Pods
Now that you have the pods running on the cluster (each pod running an instance of Docker engine) and a service that exposes each externally, let’s connect to them remotely.
There are two parts to accomplish this:
-
Configure ssh access to the pod.
-
Use the Docker CLI to connect to the pod remotely via ssh.
SSH config
To do this:
- Exec into one of the pods, and create a password for user
rootinside the pod:
$ kubectl exec -it dockerd-statefulset-0 -- passwd
Changing password for root
New password: <some-password>
-
Give the pod’s external IP address (see prior section) and password to the remote user in some secret way.
-
The remote user copies her machine’s public SSH key (e.g., generated with
ssh-keygen) to the pod.
For example, if the pod’s external IP is 35.194.9.153:
ssh-copy-id root@35.194.9.153

root@35.194.9.153's password: <some-secret-password>

Number of key(s) added: 1

Now try logging into the machine, with:   "ssh 'root@35.194.9.153'"
and check to make sure that only the key(s) you wanted were added.
Docker CLI Access
After SSH is configured, the last step is to set up the Docker client to connect to the remote Docker engine. For example:
$ docker context create --docker host=ssh://root@35.194.9.153 remote-docker
remote-docker
Successfully created context "remote-docker"

$ docker context use remote-docker
remote-docker
Current context is now "remote-docker"
And now we can access the remote Docker engine:
$ docker ps
CONTAINER ID   IMAGE     COMMAND   CREATED   STATUS    PORTS     NAMES
There it is! The remote user can now use her dedicated Docker engine to pull and run images as usual.
At this point you have a working setup. The remaining sections describe topics you should keep in mind as you work with the remote cluster.
Shared Docker Images across Docker Engines
In the current setup, each Docker engine was configured with a dedicated persistent Docker cache (to cache container images, Docker volumes, networks, etc.).
But what if you want multiple Docker engines to share an image cache?
You may be tempted to do this by having multiple Docker pods share the same Docker cache. For example, create a persistent volume for a Docker cache and mount the same volume into the “/var/lib/docker” directory of multiple pods. But this won’t work, because each Docker engine must have a dedicated cache.
A better way to do this is to setup a local image registry using the open-source Docker registry. For example, this local registry could run in a pod within your cluster, and you can then direct the Docker engine instances to pull/push images from it.
How to do this is beyond the scope of this article, but here is some useful info on this:
Scaling Pod Instances
To scale the pods (i.e., scale up or down), simply modify the replicas: clause
in the StatefulSet yaml and apply it again.
You will also need to create the Load Balancer service for any newly added pods.
Note however that when you scale down, the Load Balancer services and persistent
volumes mounted on the pod’s /var/lib/docker are not removed automatically
(you must explicitly remove them as shown next).
Persistent Volume Removal
In the StatefulSet we created above, we asked Kubernetes to dynamically create a
persistent volume for each pod and mount it on the pod’s /var/lib/docker
directory when the pod is created (see section Persistent Docker Cache above).
When the pod is removed however, Kubernetes will not remove the persistent volume automatically. This is by design, because you may want to keep the contents of the volume in case you recreate the pod in the future.
To remove the persistent volume do the following:
-
Stop the pod using the persistent volume.
-
List the persistent volume claims (pvc):
$ kubectl get pvc
NAME                                 STATUS   VOLUME                                     CAPACITY   ACCESS MODES   STORAGECLASS   AGE
docker-cache-dockerd-statefulset-0   Bound    pvc-9812e3df-6d7e-439a-9702-03925af098a5   2Gi        RWO            gce-pd         25h
docker-cache-dockerd-statefulset-1   Bound    pvc-377c35d8-4075-4d40-9d26-7e4acd42cbea   2Gi        RWO            gce-pd         25h
docker-cache-dockerd-statefulset-2   Bound    pvc-e3f65dea-4f97-4c4b-a902-97bf67ed698b   2Gi        RWO            gce-pd         25h
docker-cache-dockerd-statefulset-3   Bound    pvc-5937a358-5111-4b91-9cce-87a8efabbb62   2Gi        RWO            gce-pd         25h
docker-cache-dockerd-statefulset-4   Bound    pvc-5ca2f6ba-627c-4b19-8cf0-775395868821   2Gi        RWO            gce-pd         25h
docker-cache-dockerd-statefulset-5   Bound    pvc-afd183ab-1621-44a1-aaf0-da0ccf9f96a8   2Gi        RWO            gce-pd         25h
- Remove the desired pvc; this will also remove the persistent volume:
$ kubectl delete pvc docker-cache-dockerd-statefulset-5
Docker Build Context
When running the Docker engine remotely, be careful with Docker builds. The reason: the Docker CLI will transfer the “build context” (i.e., the directory tree where the Dockerfile is located) over the network to the remote Docker engine. This can take a long time for large images.
Docker Buildkit can help here, since it tracks changes and only transfers the portion of the build context that has changed since a prior build.
Conclusion
Running Docker inside Kubernetes pods has several use cases, such as offloading the Docker engine away from local development machines (e.g., for efficiency or security reasons).
However, until recently doing this required very insecure privileged pods or VMs.
In this blog, we showed how to do this easily & securely with pure containers, using Kubernetes + Sysbox. We hope this is helpful.
Feel free to add your comments below, and/or join the Sysbox Slack channel for any questions.