Secure (and easy) Kubernetes-in-Docker
July 21, 2020

Contents
- Intro
- Why Privileged Containers?
- Why Complex Docker Images?
- K8s-in-Docker with Sysbox
- Automating things a bit with Kindbox
- The K8s Node Container Image
- K8s Node Inner Image Preloading
- Wrapping Up
Intro
Recently, Docker containers are being used as a way to deploy Kubernetes (K8s) clusters. In this setup, each Docker container acts as a K8s node, and the K8s cluster is made up of a number of these containers (some acting as control-plane nodes, others as worker nodes) connected to each other via a container network, as shown below:
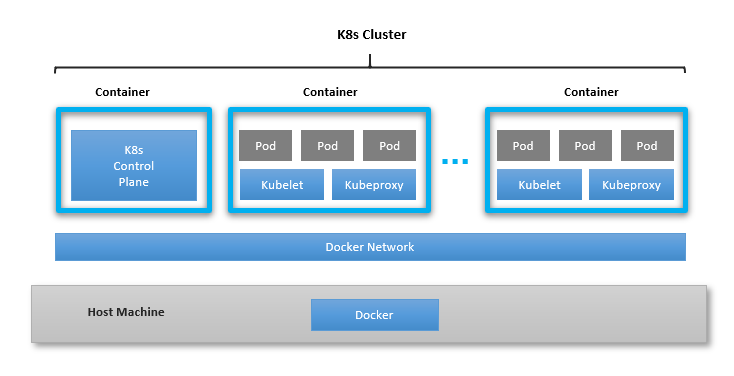
Such a setup is ideal for development, local testing, and CI/CD, where the efficiency and ease of use of containers makes this particularly attractive (e.g., it avoids the need to deploy heavier virtual machines for the same purpose).
Tools like K8s.io KinD, initially developed to test K8s itself, are now being used to create such K8s-in-Docker clusters for other purposes. While this tool works well for local developer testing, it however has important limitations that make it less suitable for enterprise or shared environments, such as:
-
Using unsecure privileged containers.
-
Requiring complex container images.
-
Supporting only a limited set of cluster configurations.
This article describes the reason for these problems and how to overcome them
using the Sysbox runtime to deploy the K8s-in-Docker cluster with strong
isolation and simple docker run commands.
Cloud developers, QA engineers, DevOps, sys admins, or anyone who wishes to deploy isolated K8s environments will find this info very useful. Note that this article is specific to containers on Linux.
Why Privileged Containers?
As mentioned above, existing tools for deploying K8s-in-Docker use very unsecure privileged containers.
The reason for this is that the K8s components running inside the Docker
containers interact deeply with the Linux kernel. They do things like mount
filesystems, write to /proc, chroot, etc. These operations are not allowed in
a regular Docker container, but are allowed in a privileged container.
However, privileged containers in many ways break isolation between the
container and the underlying host. For example, it’s trivial for software
running inside the container to modify system-wide kernel parameters and even
reboot the host by writing to /proc.
Furthermore, since the container acting as a K8s node is privileged, it means that if an inner K8s pod is deployed using a privileged security policy, that pod also has root access to the underlying host. This forces you to trust not only the software running in the K8s nodes, but also in the pods within.
And this lack of isolation is not just a security problem. It can also be a
functional one. For example, a privileged container has write access to
/proc/sys/kernel, where several non-namespaced kernel controls reside. There
is nothing preventing two or more privileged containers from writing conflicting
values to these kernel controls, potentially breaking functionality in subtle
ways that would be hard to debug.
If you are an individual developer deploying K8s-in-Docker on your laptop, using privileged containers may not be a big deal (though it’s risky). But if you want to use this in testing or CI/CD frameworks, it’s much more problematic.
Why Complex Docker Images?
Another limitation of existing K8s-in-Docker tools is that they use complex container configurations. That is, they require specialized container images with custom (and tricky) container entrypoints as well as complex container run commands (with several host volume mounts, etc).
For example, the K8s.io KinD base image entrypoint does many clever but tricky configurations to setup the container’s environment when it starts.
This ends up restricting the choices for the end-users, who must now rely on complex base container images developed specifically for these tools, and who are constrained to the K8s cluster configurations supported by the tools.
The reason for this complexity is that existing K8s-in-Docker tools rely on the software stack made up of Docker / containerd and the OCI runc to create the container. This stack was originally designed with the goal of using containers as application packaging & deployment bundles (for which it does an excellent job), but falls short of setting up the container properly to run software such as K8s inside.
As a result, it’s up to the K8s-in-Docker tools to overcome these limitations, but that results in complex Docker images and Docker run commands, which in turn create restrictions for the end-users.
K8s-in-Docker with Sysbox
Wouldn’t it be great if a simple docker run could spawn a container inside
of which Kubernetes could run seamlessly and with proper container isolation?
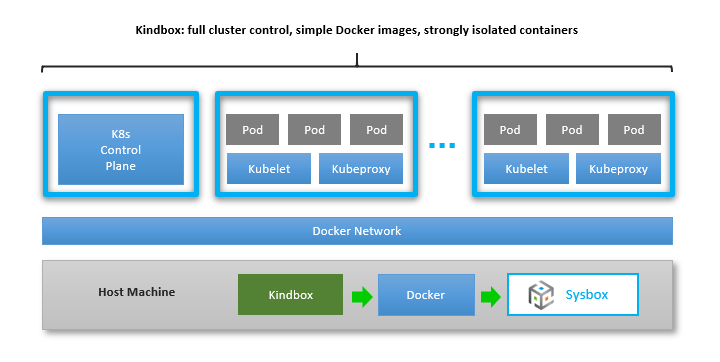
The Sysbox container runtime makes this possible (for the first time). It does so by setting up the container with strong isolation (via the Linux user namespace) and in such a way that K8s finds all the kernel resources it needs to run properly inside the container. That is, it fixes the problem at the level of the container runtime (where the container abstraction is created).
This has the effect of significantly simplifying the Docker images and commands required to deploy the containers that make up the cluster, which in turn removes complexity and enhances flexibility for the end user.
For example, with Docker + Sysbox, deploying a K8s control-plane node can be done with these simple commands:
1) Deploy the container that acts as the K8s control-plane:
$ docker run --runtime=sysbox-runc -d --name=k8s-control-plane --hostname=k8s-control-plane nestybox/k8s-node:v1.18.2
2) Ask the Kubeadm tool inside the container to initialize it as a K8s master node:
$ docker exec k8s-control-plane sh -c "kubeadm init --kubernetes-version=v1.18.2 --pod-network-cidr=10.244.0.0/16"
3) Configure kubectl on your host to control the cluster (assumes you’ve installed kubectl already):
$ docker cp k8s-control-plane:/etc/kubernetes/admin.conf $HOME/.kube/config
4) Use kubectl to configure the desired K8s container network plugin:
$ kubectl apply -f https://raw.githubusercontent.com/coreos/flannel/master/Documentation/kube-flannel.yml
That’s it! With these steps you’ll have a K8s master configured in less than 1 minute.
Deploying a K8s worker node is even easier.
5) Deploy the container that acts as a worker node:
$ docker run --runtime=sysbox-runc -d --name=k8s-worker --hostname=k8s-worker nestybox/k8s-node:v1.18.2
6) In order for the worker to join the cluster, we need a token from the control-plane:
$ join_cmd=$(docker exec k8s-control-plane sh -c "kubeadm token create --print-join-command 2> /dev/null")
7) Ask the worker to join the cluster:
$ docker exec k8s-worker sh -c "$join_cmd"
That’s it! It takes < 15 seconds to add a worker node. To add more workers, simply repeat steps 5 to 7.
Notice the simplicity of the entire operation. The Docker commands to deploy the nodes are all very simple, and the kubeadm tool makes it a breeze to setup K8s inside of the containers (with certificates and everything).
It’s also fast and efficient: it takes less than 2 minutes to deploy a 10-node cluster on a laptop, with only 1GB of storage overhead (compared to 10GB if you deploy this same cluster with the K8s.io KinD tool).
Moreover, the containers are strongly secured via the Linux user namespace. You can confirm this with:
$ docker exec k8s-control-plane sh -c "cat /proc/self/uid_map"
         0     165536      65536
which means that root user (id 0) on the K8s control plane container maps to unprivileged user 165536 on the host. No more privileged containers!
And because you are using Docker commands to deploy the K8s cluster, you have full control of the cluster’s configuration, allowing you to:
-
Choose the cluster’s topology to match your needs.
-
Choose any container image for the K8s nodes (and one which you fully control).
-
Choose different images for different nodes if you want.
-
Place the containers on the Docker network of your choice.
-
Deploy the cluster on a single host or across hosts using Docker overlay networks.
-
Resize the cluster easily.
-
Mount host volumes per your needs, etc.
-
In the near future, constrain the system resources assigned to each K8s node.
In short, you are only limited by Docker’s capabilities.
All of this simplicity comes by virtue of having the underlying container runtime (Sysbox) take care of setting up the container properly to support running K8s (as well as other system-level workloads) inside.
Automating things a bit with Kindbox
Though Sysbox enables you to deploy a K8s cluster with simple Docker commands, it’s easier to have a higher level tool that will do these steps for you.
There is one such tool here: https://github.com/nestybox/kindbox
It’s called Kindbox (i.e., Kubernetes-in-Docker + Sysbox), and it’s basically a simple bash wrapper around Docker commands similar to those shown in the prior section.
Kindbox supports commands such as creating a K8s-in-Docker cluster with a configurable number of nodes, resizing the cluster, and deleting it. You can deploy multiple clusters on the same host, knowing that they will be strongly isolated by the Sysbox runtime.
Check out this video to see how it works.
You may be asking: what’s the point of Kindbox if similar tools such as K8s.io KinD exist already?
The answer is that while at a high level they do the same thing (i.e., manage creation of a k8s-in-docker cluster), the way they go about this is very different: K8s.io KinD requires complex Docker configurations and unsecure privileged containers due to limitations of the OCI runc. On the other hand, Kindbox uses simple Docker configurations and strongly isolated containers, by leveraging the capabilities of the Sysbox runtime. This makes Kindbox a much simpler tool, one that users can easily customize and adapt to their needs.
The K8s Node Container Image
In the prior examples, we used the nestybox/k8s-node:v1.18.2 image to deploy the containers that act as K8s nodes in the cluster. You may be wondering what’s inside that container image and whether there is any trickery in there.
The answer is that it’s a very simple image that includes Ubuntu, systemd, kubeadm, and Docker, and there is no trickery whatsoever (no complex entrypoints, no special volume mounts, etc). The Dockerfile is here.
You can use any container image you want, as long as it includes the software required to run K8s. In fact, having Docker inside the K8s node is not required (containerd would suffice).
The only interesting (and cool) thing about the nestybox/k8s-node:v1.18.2
image is that it comes preloaded with inner container images for the K8s
components. That is, after step (1) in the example above, if you do docker
image ls inside the container, you’ll see this:
$ docker exec -it k8s-control-plane sh -c "docker image ls"

REPOSITORY                           TAG                 IMAGE ID            CREATED             SIZE
k8s.gcr.io/kube-proxy                v1.18.2             0d40868643c6        3 months ago        117MB
k8s.gcr.io/kube-controller-manager   v1.18.2             ace0a8c17ba9        3 months ago        162MB
k8s.gcr.io/kube-apiserver            v1.18.2             6ed75ad404bd        3 months ago        173MB
k8s.gcr.io/kube-scheduler            v1.18.2             a3099161e137        3 months ago        95.3MB
quay.io/coreos/flannel               v0.12.0-amd64       4e9f801d2217        4 months ago        52.8MB
k8s.gcr.io/pause                     3.2                 80d28bedfe5d        5 months ago        683kB
k8s.gcr.io/coredns                   1.6.7               67da37a9a360        5 months ago        43.8MB
k8s.gcr.io/etcd                      3.4.3-0             303ce5db0e90        9 months ago        288MB
What are these inner container images? They are container images for the K8s control plane components. Turns out Kubeadm deploys the K8s components using containers (e.g., one container for the kube-api-server, another for the kube-controller-manager, etc.) These containers live fully inside the K8s node container and are not seen by the Docker on the host. Some of these images are actually deployed as privileged containers, but since they live inside the K8s node container deployed by Sysbox, they are only privileged within the K8s node, but not at host level.
By preloading these inner container images into the K8s node image, the kubeadm initialization in step (2) of the example above goes much faster since the images need not be downloaded from the network.
K8s Node Inner Image Preloading
So how were these inner container images preloaded into the K8s node image? The answer may surprise you: using a simple Dockerfile.
This Dockerfile creates the K8s node image by installing Docker inside,
then installing kubeadm inside, and then directing kubeadm to pull the K8s component
inner images with a command such as kubeadm config images pull.
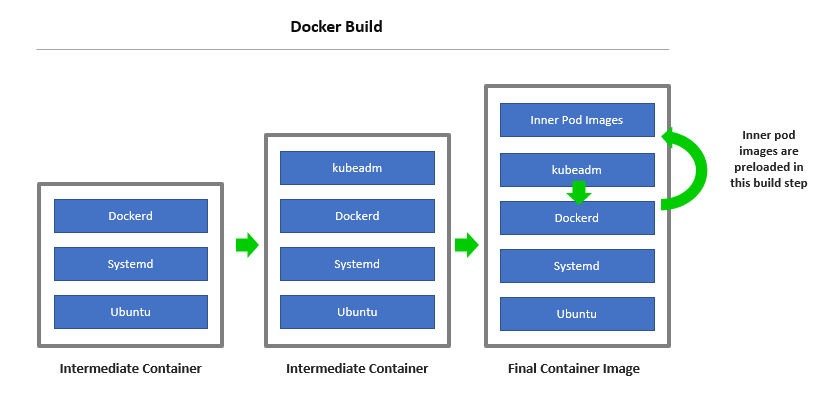
During the docker build, this causes the following to occur inside the K8s node container: the inner kubeadm talks to the inner Docker daemon and directs it to pull the K8s component images. The inner Docker daemon pulls the images and stores them inside the container. The result is a K8s node container image that is preloaded with the inner K8s control-plane container images.
But wait: doesn’t this imply Docker-in-Docker during the docker build? Yes, that’s exactly what’s happening. As the outer Docker daemon is building the image layers for the K8s node image, it invokes the inner kubeadm to pull the images, which then talks to the inner Docker to actually pull them.
It’s a very powerful approach that allows you to easily embed any inner container images that you want inside the outer container with a simple Dockerfile. The following image illustrates this.
There is only one caveat in order for this to work: the docker build command
must use the Sysbox runtime as it builds the K8s node container image layers, as
otherwise the Docker-in-Docker during the build won’t work. Unfortunately, the
docker build command lacks an option to select the container runtime (i.e.,
there is no docker build --runtime option for example), so you must configure
Docker on the host to use Sysbox as it’s “default runtime” before doing the
Docker build.
You do this by configuring Docker’s daemon.json file as follows:
$ sudo more /etc/docker/daemon.json
{
    "default-runtime": "sysbox-runc",
    "runtimes": {
        "sysbox-runc": {
            "path": "/usr/local/sbin/sysbox-runc"
        }
    }
}
Once you have this configuration in place, you restart the Docker daemon (sudo systemctl restart docker)
and then simply build the k8s node image as usual:
$ cd <path-to-dockerfile>
$ docker build -t nestybox/k8s-node:v1.18.2 .
When the build completes, you can revert the default runtime configuration if you wish (it’s only needed during the build).
Wrapping Up
Deploying K8s clusters inside containers is very useful, fast, and efficient.
While there are tools that do this already (e.g., K8s.io KinD), they are not suitable for enterprise or shared environments due to the use unsecure privileged containers, complex container images, and lack of sufficient flexibility.
The Sysbox runtime resolves these problems at a lower level in the software stack, by enabling containers to run system workloads such as systemd, Docker, and K8s inside, seamlessly and with strong isolation.
This results in simplicity at the higher layers, enabling you to deploy K8s clusters with proper isolation, using simple Docker images and Docker commands, and with total control of the cluster’s configuration. In addition, Sysbox makes it easy to preload inner container/pod images into the k8s node image, and is capable of deploying the cluster with high speed and efficiency.
To learn more, go to www.nestybox.com. Sysbox is free to download for individual developers, so you can play as much as you want with it.